Before diving headlong into the guts of the device trying to remedy a problem, make sure the top end, or user serviceable stuff is in good shape.
Tubes. The vast majority of these things operate by means of a heating element, and you can typically see it at work.
In my experience, if a tube doesn't light up it's probably dead.
Removing and replacing these are best acheived
with a slightly circular rocking motion while either pulling up or pressing in. Too vigorous a rotation can result
in either bent pins or sheared key pin (octals), you just want enough sideways pressure to put the upward or
downward force on one side of the pins, if that makes sense.
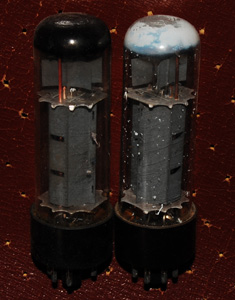
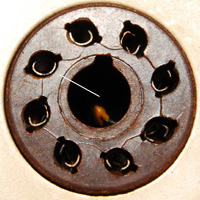
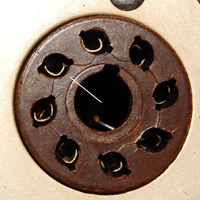
Terminal tube failures are sometimes easy to spot. In addition to previously mentioned filament failure, a broken envelope will allow the getter flash to oxidize, turning it white. The tube to the right has been compromised, and an attempt to use it would probably involve melting its filament heater and could include arcing/short circuit in the B+ power supply. Always replace tubes that display this white ashen dust.
Other failures with tubes are usually age related (age as in hours of use, not as in date of birth) and are harder to spot without test equipment. The upside is that an aged tube will typically not render a circuit inoperable, just impair it a bit until that tube can be replaced.
What follows is, I remain fairly certain, a joke:
While I am also fairly confident that everyone taking the time to actually read these pages already respects the fact that
vacuum tubes require, well, an evacuated envelope or vacuum to operate without melting down, many people who populate this earth
continue to amaze me with acts of rampant stupidity. So, I am inspired to take a moment and say "please don't do this."
Just, don't.
Special mention should also be given to output tubes in a push/pull configuration. It's rather important that these tubes be matched in strength, as they are in a sort of electrical tug-o-war and imbalance will exact unnecessary wear on -both- tubes. Keep balanced circuits just that.
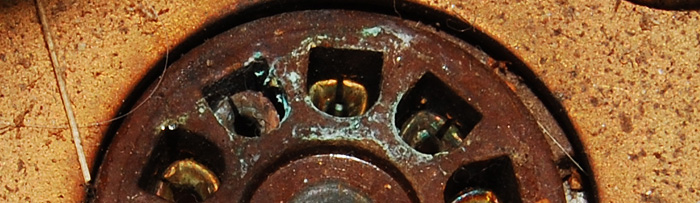
Sockets. Before placing the blame of failure on a tube, make sure the socket is in serviceable condition. These parts
sometimes receive the brunt of decades of neglect and can relax, oxidize or become fouled with foreign material.
Do keep in mind that the socket is what delivers the array of voltages to the tube, and as such tends to be connected
to the power supply. Discharging the power supply is highly recommended.
There are two aspects of tube sockets that need to be addressed, conductivity and tension. Unless the socket is
visibly burnt or rusty, conductivity can usually be insured by squirting a little contact cleaner in it and working
a tube into and out of it several times. Contact cleaner for this use should be of the residue free variety, as
a residual lubricant (like you want for cleaning potentiometers) can over time trap particulates, which can act
as a carbon path (resistor) if allowed to build up.
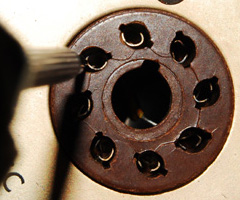
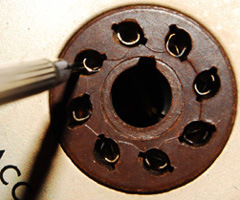
The socket contacts can usually be retensioned by gently squeezing the contact a bit through means of a probe and
delicate application of leverage. Those of you with hawkeyes will note that the utensil I am using to tension
these sockets is made from metal, and as such is highly conductive. I have done this procedure with a wooden toothpick
in the past, having not bothered to open up and discharge the unit. Proceed with caution, as some tube sockets are directly
in line with high value caps, which can be excellent charged storage devices.
Sometimes the most effective fix for a socket is replacement..
Potentiometers. Also referred to as pots, controls, knobs, volume, etc..
The most common pot failure is indicated with a scratchiness or interruption of effect somewhere along the travel
of the control. This is usually due to oxidation or grit within the pot itself, and can often be remedied through
exercising the range of the pot or flushing it with a lubricated electronics cleaner. I urge caution with the first,
and most common tactic, that of exercising the control without the addition of a lubricating cleaner, because the
conductive trace can suffer premature wear, scoring or gouging through friction with foreign material. Same
caution applies to cleaning with a contact cleaner and following up with a protective lubricant; if this approach
is followed, it's probably best to allow the contact cleaner to dissolve oxidization with minimal exercise of the
controls.
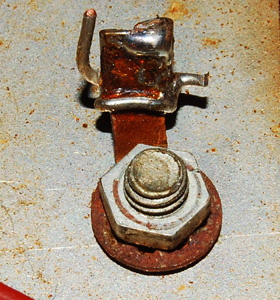
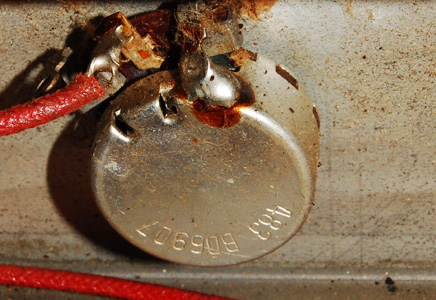
Ground connections. I like to get a good idea of where the grounding occurs in the circuit. For those who have no idea just what I'm talking about, look for the points at which wires connect to the chassis or enclosure of the unit. Sometimes there will be a grounding lug that is mechanically fixed as opposed to soldered, this is a breeding ground for oxidization or loosening. When I see this grounding method I like to either loosen, exercise and resecure or forgo the mechanical system and solder it. I'll usually err on the simpler retension approach unless the device is giving me grief. Look for lugs connected to the chassis by mounting screws, or fixed to the faceplate by the controls themselves. The following images depict what was once a grounding lug (since bypassed) and what remains ground connection at a pot.